
Software Localization Best Practices: 10 Steps with Examples
This guide walks you through the software localization process from start to finish, with best practices and real code examples.
Your app just launched in France. Sign-ups are rolling in, and then support tickets start flooding your inbox. Users can’t click the “Buy now” button because it’s been cut off. Navigation menus are breaking across two lines. Your carefully designed UI looks completely broken.
This is what happens when you jump straight to translation without localizing your software properly. The text gets translated, but the app wasn’t built to handle it.
This guide covers everything you need to get software localization right. You’ll learn:
- What software localization is
- The difference between localization, translation, and internationalization
- How to prepare for the software localization process
- Best practices for dynamic content, text expansion, locale-specific formatting, and testing
- The cost of software localization
- How to set up a localization workflow that doesn’t break every release

What Is Software Localization?
Software localization is the process of adapting your software for a specific market. This goes beyond translating text. It means adjusting everything that affects how users in the target market experience your software: date and number formats, currency, UI layout, images, and cultural references.
The goal is to make your software feel like it was built for that market from the start.
Here’s an example that shows how the same date can mean two different things depending on where your user is:
| User Location | Sees | Reads It As |
|---|---|---|
| United States | 04/05/2025 | April 5, 2025 |
| United Kingdom | 04/05/2025 | May 4, 2025 |
That’s one small example of what software localization handles. Multiply it across dates, currencies, formats, and cultural references, and you start to see the scope of the work.
Software Localization vs. Translation vs. Internationalization
Many people use these three terms interchangeably, but they mean different things and happen at different stages of development.
| Translation | Localization | Internationalization | |
|---|---|---|---|
| What it is | Converting text from one language to another | Adapting software to fit a specific region | Building software so it can be localized |
| Who does it | Translators | Translators, designers, developers | Developers |
| When it happens | During localization | After internationalization | Before localization |
| Scope | Words and phrases | Currency, formats, layout, images, cultural references, legal content | Code architecture, resource files, format support |
| Example | “Settings” → “Paramètres” | Layout adjusted for German text expansion, € currency, DD/MM date format | Strings stored in external files, UI built to flex with text length |

The Software Localization Process
Software localization isn’t a single step you complete before launch. It’s an ongoing process that runs alongside development. Here’s an overview of how it typically breaks down:
| Stage | What happens |
|---|---|
| Internationalization | Developers prepare the codebase by externalizing strings, making UI layouts flexible, and making sure format handling is built in |
| Content extraction | Localizable strings are pulled from resource files and sent for translation |
| Translation | Strings are translated, by human translators, machine translation, or a combination of both |
| Integration | Translated files are merged back into the codebase |
| Testing | Each localized version is tested for layout, functionality, and accuracy |
| Release | The localized version ships alongside or after the source language version |
Most teams run the process in one of three ways:
- Waterfall Localization starts after development is complete. You finish building, then hand everything off for translation in one batch. It’s simple to manage, but it delays your release in other languages and makes bugs expensive to fix at that stage.
- Agile localization Localization runs alongside development. Instead of one big batch at the end, you send strings for translation throughout the development cycle. The timing is better, but the process is still manual. Someone on your team needs to export strings, manage handoffs, and import translations back.
- Continuous localization Localization is fully automated. Your repository connects directly to your translation tool, so when a string changes, it gets sent for translation automatically. When the translation is ready, it gets merged back automatically.

Software Localization Best Practices
Every project is different, and your localization needs will depend on your stack, your target markets, and your team. This list covers the core of what makes software localization work.
Store all your translatable text in separate files
When you hard-code text directly into your source code, translation tools can’t find it. These tools work by scanning resource files like JSON, PO, or YAML for strings to translate. If your text is buried inside your JavaScript, PHP, or Ruby files, the scan comes back empty.
This is the most common reason localization projects fail. Teams only discover the problem when they try to translate and realize they need to refactor thousands of strings first.
That’s why it’s best to move all user-facing text into dedicated resource files from the start. This includes everything your users can see:
- UI labels, buttons, and menu items
- Error messages and validation text
- Email templates and notifications
- Help text, tooltips, and placeholder text
- Success and confirmation messages
Which file format you use depends on your framework:
| Format | Used for |
|---|---|
.json |
JavaScript frameworks (React, Vue, Angular) |
.po/.pot |
WordPress, PHP, Python |
.yaml/.yml |
Ruby on Rails |
.xml |
Android |
.xcstrings |
iOS/macOS |
Here’s a before and after for each major framework.
Before
<button>Submit</button>After, using react-i18next
<button>{t('submit_button')}</button>WordPress:
Before
echo 'Submit';After, WordPress i18n
echo __( 'Submit', 'your-textdomain' );Before
flash[:notice] = "Profile updated successfully"
After, using Rails I18n:
flash[:notice] = t('profile.update_success')
It’s also important to give your strings clear, descriptive keys. A key named checkout.submit_button tells a translator exactly where this string appears and what it does. On the other hand, string_147 tells them nothing, which leads to mistranslations. Descriptive keys also make it easier for your own team to track which strings have been externalized and spot anything that’s missing.
Use placeholders for names, numbers, and dates
When your text includes variable data like a user’s name or an order number, it’s tempting to build the sentence by joining pieces of text together in your code. This breaks in other languages.
Here’s why:
const message = 'Hello, ' + name + '!';This example splits the sentence into three fragments. In English, the word order works. But in languages like Japanese, the name comes in a different position in the sentence. Your translators can’t reorder fragments, so the sentence ends up grammatically wrong.
Placeholders solve this by keeping the sentence whole. Your translators or translation tool get the full sentence to work with, including a marker showing where the variable goes. They can put that marker wherever the grammar of their language requires it.
Here’s what placeholders look like in different file formats:
JSON:
{ "greeting": "Hello, {name}!" }YAML:
greeting: "Hello, %{name}!"
PO:
msgid "Hello, %s!"
The syntax varies by format, but the principle is the same.
Build your UI to handle longer text
Most languages are longer than English. A button that fits perfectly in your English UI will often get cut off in German, French, or Spanish. If you’ve built your layout around fixed widths, you’ll have a broken UI in every language you add.
These are the typical expansion rates you’re working with:
| Language | Typical expansion vs. English |
|---|---|
| German | +30-35% |
| French | +15-20% |
| Spanish | +15-25% |
| Finnish | +30-40% |
| Chinese | Often shorter, but different character spacing |
Individual words can expand far more than these averages. “FAQ” becomes “Preguntas frecuentes” in Spanish — that’s a 567% increase.
The solution is to build flexible layouts rather than fixed ones. Instead of setting a fixed width on a button, let it grow with its content:
Before — fixed width breaks in longer languages
button { width: 120px; }
After — grows with the translated text
button {
  min-width: 120px;
  width: auto;
  padding: 8px 16px;
}
Think about this in the design phase. If you design for English first and translate later, you’ll spend more time debugging layout issues in every language than you would have spent building flexibility in from the start.
Write text that’s easy to translate
The way you write your source text affects translation quality. Vague phrasing, idioms, and clever wordplay often produce confusing or incorrect translations.
The most common problems to avoid:
Incomplete sentences
A string like “No items” could mean several things. Are there no items in the cart? Has a search returned no results? Your translator has to guess, and a wrong guess means a wrong translation.
Write full sentences with a clear subject and verb.
Before — ambiguous
"No items"
After — clear meaning
"You have no items in your cart."
Idioms
“This is a piece of cake” makes sense to a native English speaker. Translated literally into German, your users will wonder why your app is talking about dessert. Most expressions only work in the given language, so it’s best to avoid them altogether.
Complex vocabulary
Simple words translate more reliably. Write “remove” instead of “eliminate” and “use” instead of “utilize”. When in doubt, choose the shorter, more common word.
Handle dates, numbers, and currencies correctly
Date and number formats vary significantly between locales. Hard-coding these formats causes the same problem as hard-coding text: it works in one market and breaks in others.
| Element | US format | European format |
|---|---|---|
| Date | 04/05/2025 | 05/04/2025 |
| Large number | 1,000,000.00 | 1.000.000,00 |
| Currency | $1,000 | 1.000 € |
Use your framework’s built-in localization utilities to format these automatically based on the user’s locale.
JavaScript:
Before
const price = '$' + amount.toFixed(2);After
const price = new Intl.NumberFormat(userLocale, {
  style: 'currency',
  currency: currencyCode
}).format(amount);
Ruby on Rails:
Before
"$#{price}"
After
number_to_currency(price, locale: I18n.locale)
This way, the same code handles formatting correctly for every locale you support.
Plan for locale, not just language
Language and locale are not the same thing. Spanish is a language. Mexican Spanish (es-MX), Spanish from Spain (es-ES), and Argentinian Spanish (es-AR) are locales. The differences between them go beyond vocabulary. Date formats, currency, cultural references, and tone can all vary.
If you only specify a language code without a locale, you risk showing the wrong content to users in specific regions.
Take French as an example:
| Locale code | Variant |
|---|---|
| fr-FR | French as spoken in France |
| fr-CA | Canadian French |
| fr-BE | Belgian French |
| fr-CH | Swiss French |
When you set up your resource files, use full locale codes rather than language codes alone. This gives you the flexibility to serve different content to different regions without restructuring your setup later.
Give translators the context they need
If you decide to work with human translators, keep in mind that they work directly from your resource files. Without additional information, all they see is the string itself. They have no way to know where it appears in the UI, what it refers to, or how much space the translation has to fit into.
A string like “Cancel” could refer to canceling an order, a subscription, or a form submission. Each of those might translate differently depending on the language.
Add comments to your resource files to explain what each string does and where it appears:
JSON with context comments
{
  // Button in the checkout flow. Cancels the current order. Keep short.
  "checkout.cancel_button": "Cancel",

  // Error message shown when login fails. Followed by a link to reset password.
  "auth.login_error": "Incorrect email or password."
}
If you use a translation tool, most platforms let you attach screenshots that show where these strings appear. This allows translation tools to produce significantly more accurate translations than when working from text alone.
Set up language detection
Once your strings are in resource files and your UI is flexible, you need to show each user the right language automatically. Most frameworks handle this with built-in i18n libraries.
React with react-i18next:
i18n
  .use(LanguageDetector)
  .use(initReactI18next)
  .init({
    resources,
    fallbackLng: 'en',
    detection: {
      order: ['navigator', 'localStorage']
    }
  });
Ruby on Rails:
before_action :set_locale

def set_locale
  I18n.locale = extract_locale_from_accept_language_header || I18n.default_locale
end
Always set a fallback language. When a translation file is missing or a string hasn’t been translated yet, your app shows the fallback instead of a broken key like auth.login_error.
For web apps, you can also let users override the detected language manually. Store their choice so it persists across sessions:
// Save the user's choice
localStorage.setItem('userLanguage', selectedLanguage);

// Check for a saved choice first, then fall back to the browser language
const userLanguage = localStorage.getItem('userLanguage') || navigator.language;
Mobile apps generally don’t need a language switcher. Users expect mobile apps to follow their device settings.
Choose a localization tool
A manual localization workflow looks something like this: export strings to a spreadsheet, send it to a translator, wait several days, get it back, copy translations into your files, discover you missed 12 strings, and start over. It doesn’t scale.
A software localization tool manages the entire workflow for you. A good one will:
- Connect to your repository, detect new and changed strings, and keep translations up to date continuously
- Give your team a central place to manage all translations
- Include built-in CAT features like translation memory, length limit detection, and terminology management
PTC does all of this. Plus, the trial covers your first 20,000 words in 2 languages, and getting started takes less than 5 minutes.
Learn how PTC handles software localization
Test every localized version before launch
Translation is not the final step. Before you ship a localized version, test it the same way you would test any other release.
Layout: Does text fit without getting cut off? Does navigation still work, or are you seeing overflow?
Functionality: Do forms submit correctly? Do error messages appear in the right language? Does search handle accented characters like é, ñ, and ü?
Formatting: Are dates in the right format for the locale? Are numbers and currencies formatted correctly? Is the currency symbol in the right position?
Right-to-left languages: If you support Arabic or Hebrew, test the full RTL layout separately. RTL support affects more than text direction. It affects your entire UI layout.
Build localization testing into your QA process from the start. Finding a broken checkout flow in German through user reviews is significantly more expensive than catching it before launch.

How Much Does Software Localization Cost?
Good software localization doesn’t have to be expensive. The biggest factor in your budget isn’t how many languages you support. It’s how you translate.
Professional human translation for software typically runs between $0.10 and $0.30 per word. For a medium-sized app with 15,000 words, that’s $1,500 to $4,500 per language, before you factor in testing, project management, or future updates every time your product changes.
AI translation with a tool like PTC costs a fraction of that:
| Human translation | PTC | |
|---|---|---|
| 15,000 words, 1 language | $1,500 to $4,500 | ~€37 |
After the trial, PTC works on a Pay-As-You-Go model. Your first 500 words every month are free. The more you translate, the lower your per-word rate, and once you reach a lower rate, you keep it for three months even if your volume drops.
To get an exact figure for your project, use PTC’s pricing calculator or upload your resource file directly to see the cost before you commit.
Calculate your translation cost

Set Up Your Software Localization Process in 3 Steps
The software localization best practices above cover a lot of ground. Some of it, like writing translatable copy or planning for locale, requires deliberate decisions from your team. But a large part of the technical work, like detecting string changes, managing translation files, flagging length issues, and keeping translations in sync, can be automated with the right tool.
Here’s how to get a working localization process in place with PTC.
Sign Up for PTC
Create a project in PTC, upload your resource files, and select your translation languages. During the trial, you can select 2 languages.
PTC automatically generates a description of your app based on the uploaded file. Review the description and keep it or edit it. You can also upload existing translations and add a glossary of terms that should always be translated a specific way, like product names or technical terminology.
The whole setup takes less than 5 minutes.

View and refine translations
Once translations are ready, instead of editing individual strings manually or adding team members to handle reviews across specific languages, you can do an AI translation review with PTC.
AI Visual QA takes the standard string-level review process further by examining your actual UI across every target language.
What you stop doing:
- Manually opening your product in each target language to check for display issues
- Coordinating QA reviewers who speak the target languages
- Discovering broken layouts or missing strings after a release
What you get instead:
- PTC reviews your translated UI visually and finds issues that string inspection cannot catch
- Problems found in translations PTC generated are fixed automatically
- Every language is reviewed before release, in minutes rather than hours
To get started, go to the AI Visual QA tab from your dashboard. Depending on the type of software you’re translating, you’ll be able to either upload screenshots of your UI or use the PTC Visual QA browser extension to record the screens for review.
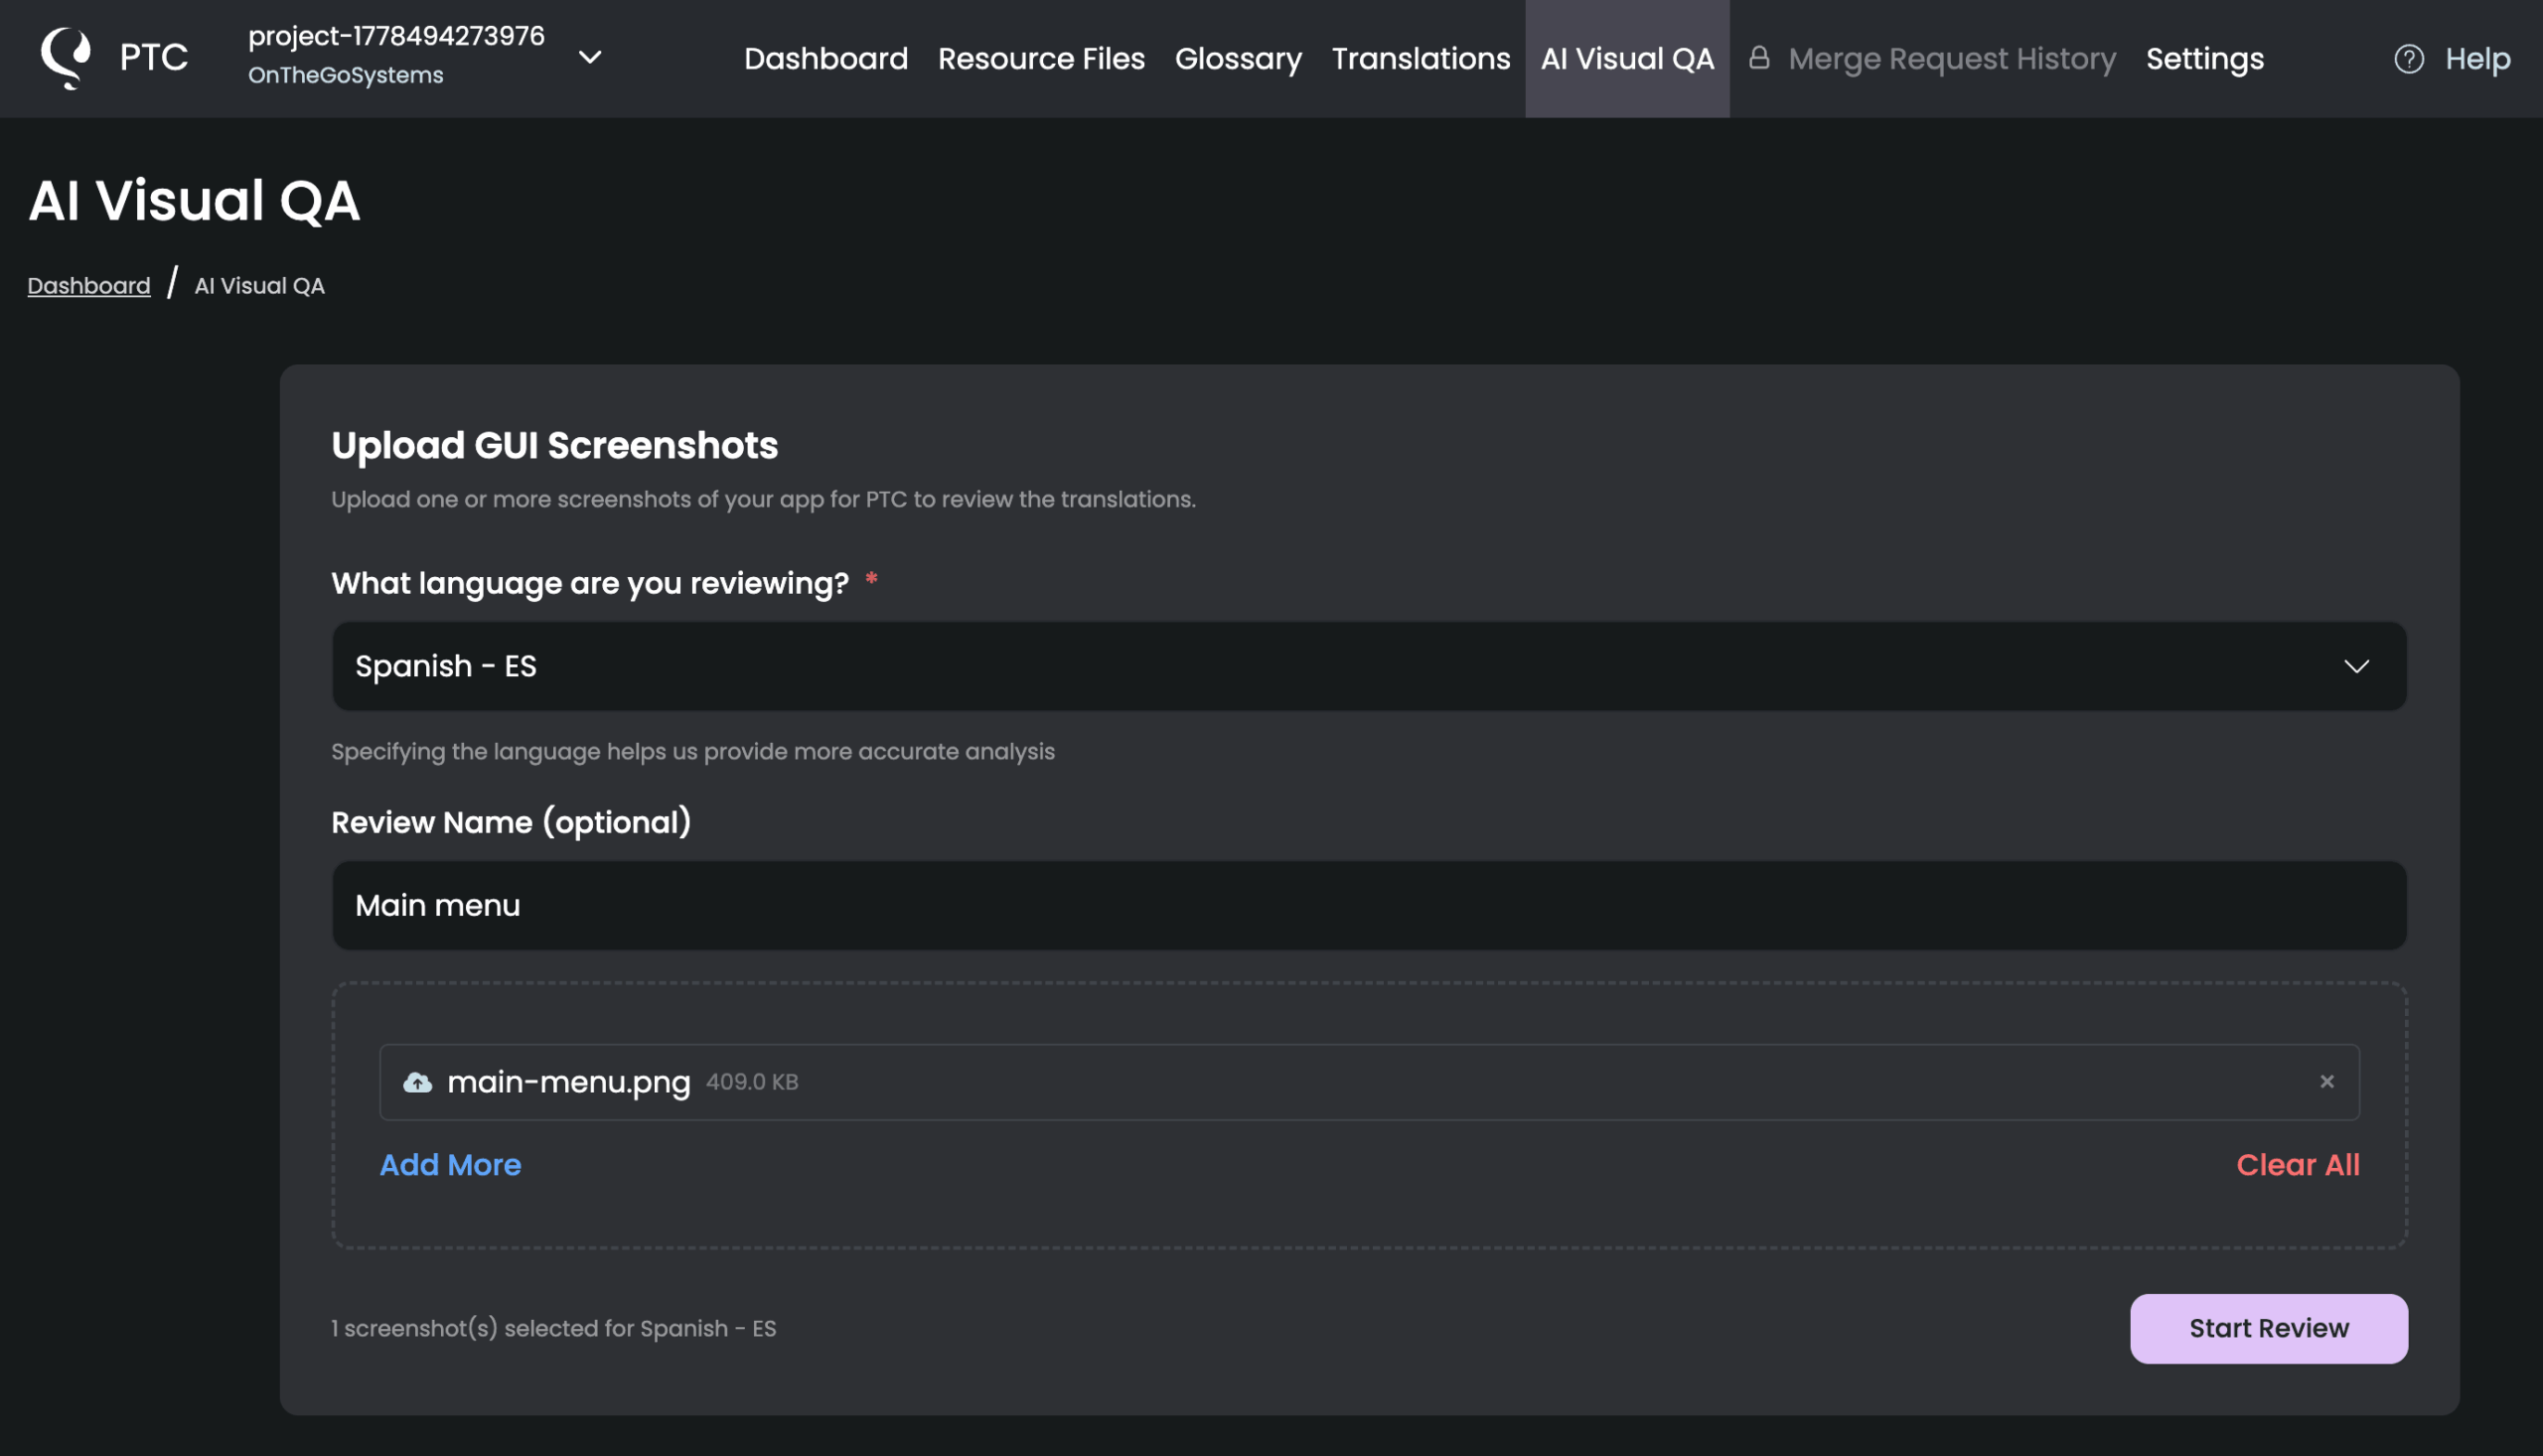
PTC will scan for issues that only appear once your app is running. It automatically fixes translation-level issues, like awkward phrasing, wrong tone or text that doesn’t fit the context. Code-level issues, such as missing keys, hardcoded strings, and formatting bugs get flagged for your team to resolve in the source.
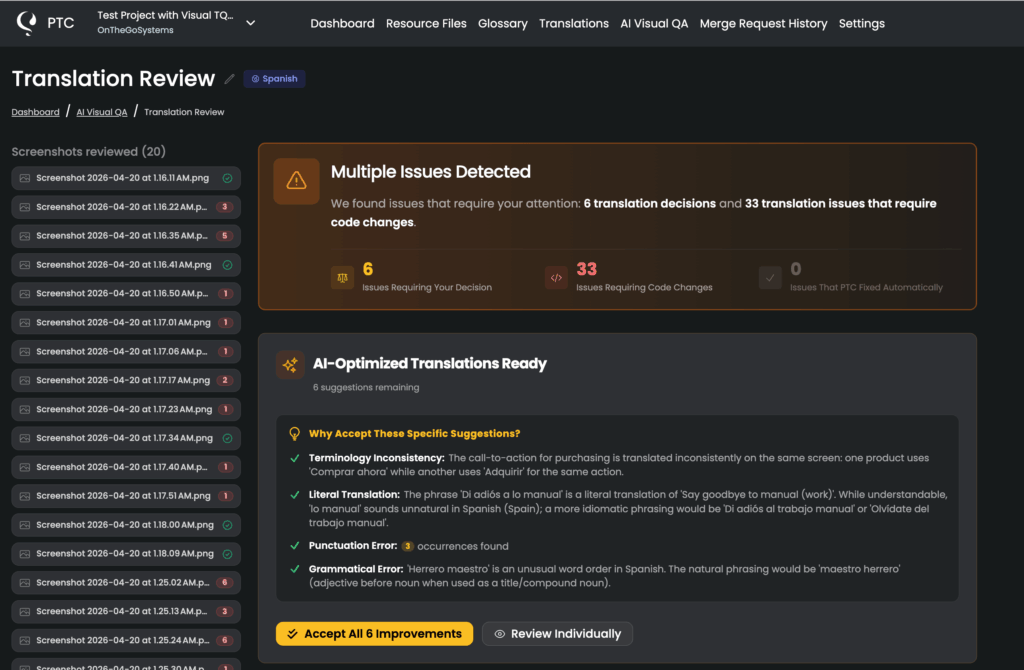
Connect your development workflow
When you’re comfortable with how PTC works, upgrade to Pay-As-You-Go to access Pro features, like connecting PTC to your GitHub, GitLab, or Bitbucket repository. With this integration, PTC detects new and changed strings automatically and keeps your translations up to date without manual file uploads.
If you want to go further, the PTC API lets you integrate translation directly into your CI/CD pipeline, so localized versions are always ready to ship alongside your source language.

Software Localization Example: Translating WPML with PTC
WPML is one of the most widely used multilingual plugins for WordPress. Keeping it translated across 23 languages is not optional. It is part of every release.
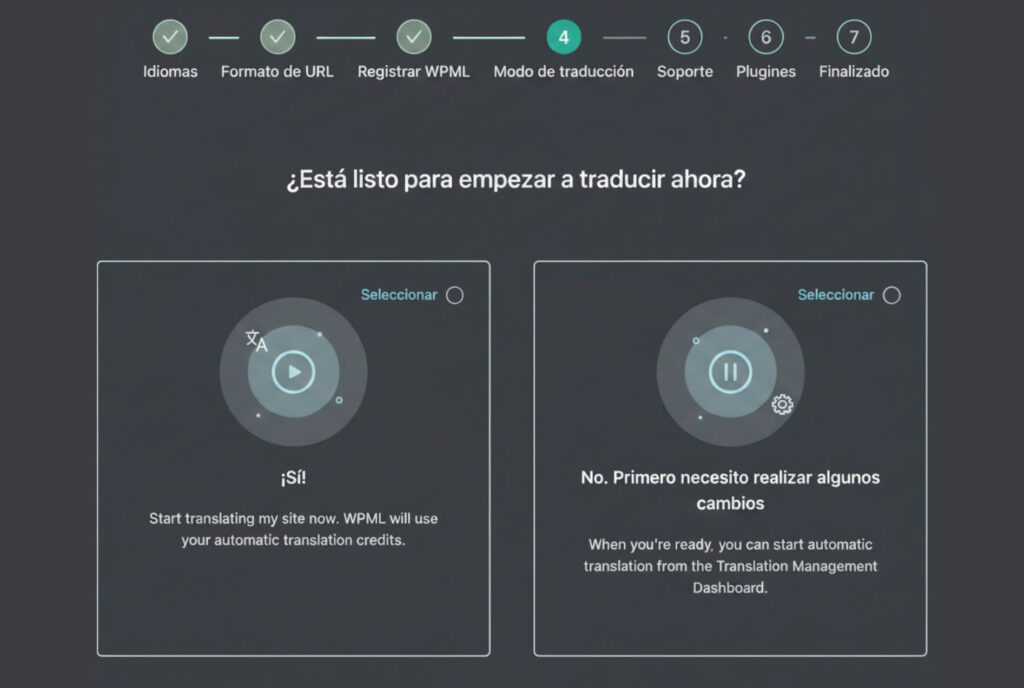
For years, the team did it the traditional way: hiring professional human translators, managing glossary files, and coordinating updates across languages for every release. Each time, they had to re-explain the product, the terminology, and expectations from scratch. The cost ranged from $1,000 to $8,000 per release.
They tried alternatives: crowdsourcing, automated workflows, and hybrid models. Nothing solved the problem.
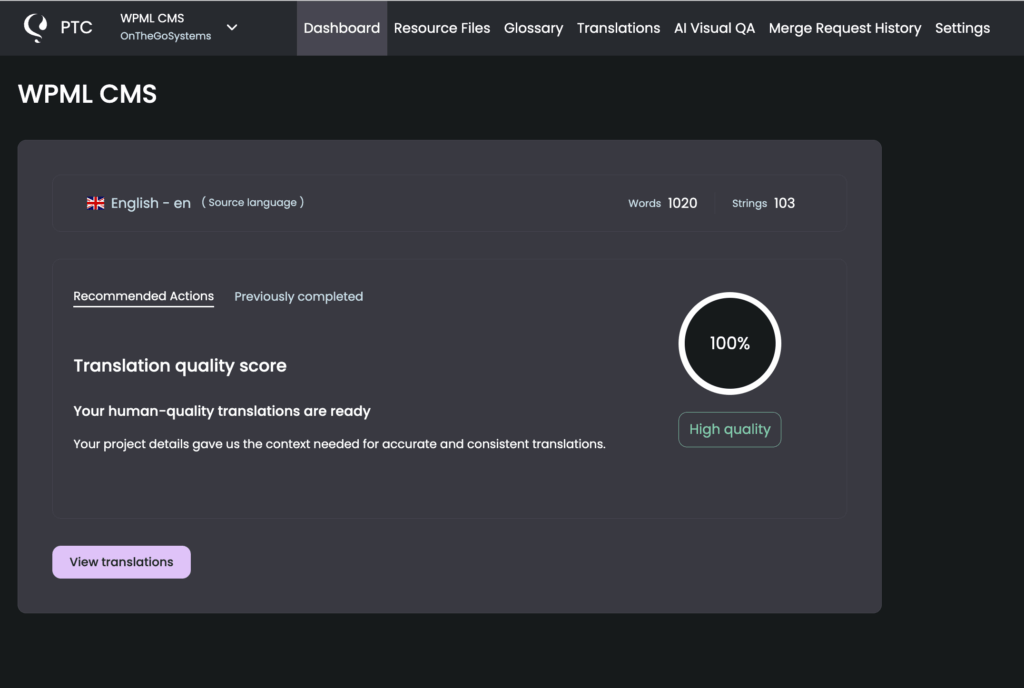
Since switching to PTC, releases go out on time. Translations are complete, accurate, and consistent across all 23 languages, with no string freeze, no coordination overhead, and no delays.
Before PTC
After PTC
Start Localizing Your Software Today
The PTC trial covers your first 20,000 words in 2 languages. Getting started takes less than 5 minutes.