Learn how to translate a React app with react-i18next, including React internationalization, plurals, dynamic content, and translating JSON files.
By the end of this guide, you’ll have a working React localization setup that switches languages in real time and is ready for as many languages as you need.
React Internationalization Example
The steps below walk through a complete React i18n example, including initializing i18next, translating text, handling pluralization and adding a language switcher.
You can follow along with the full React localization demo on GitHub.
1
Set Up Your React App
This guide uses a React + TypeScript app built with Vite. If you’re adding react-i18next to an existing app, skip to Step 2.
To create a new React + TypeScript app, run:
npm create vite@latest react-localization-demo -- --template react-ts
cd react-localization-demo
npm install
npm run devThis starts a development server and opens the default Vite + React page in your browser.


2
Install and Configure react-i18next
Install the libraries:
npm install i18next react-i18next
Create your React i18n folder structure:
src/
  i18n/
    locales/
en.jsonAdd your English strings to src/i18n/locales/en.json:
{
  "welcome": "Welcome",
  "description": "This is a localization demo.",
  "clickMe": "Click me"
}Each key (welcome, description, clickMe) maps to the text you want to display in the UI.
Prepare Your React Components for Translation
Here’s a typical React component with hardcoded strings:
function App() {
  return (
    <div>
      <h1>Welcome</h1>
      <p>This is a localization demo.</p>
      <button onClick={() => alert('Click me')}>Click me</button>
    </div>
  );
}Replace the hardcoded text with the useTranslation hook in src/App.tsx:
import { useTranslation } from 'react-i18next';

function App() {
  const { t } = useTranslation();

  return (
    <div>
      <h1>{t('welcome')}</h1>
      <p>{t('description')}</p>
      <button onClick={() => alert(t('clickMe'))}>{t('clickMe')}</button>
    </div>
  );
}

export default App;useTranslation() gives your component access to:
t()– looks up a string by keyi18n– lets you change languages programmatically
3
Initialize i18next in Your React App
Create src/i18n/index.ts to configure i18next and load translation files automatically.
import i18n from 'i18next';
import { initReactI18next } from 'react-i18next';

type TranslationResources = string | { [k: string]: TranslationResources } | TranslationResources[];

const modules = import.meta.glob<{default: Record<string, TranslationResources>}>('./locales/*.json', { eager: true })

const resources: Record<string, { translation: Record<string, TranslationResources> }> = {};

for (const path in modules) {
  const lang = path.match(/\.\/locales\/(.*)\.json$/)?.[1];
  if (lang) {
    resources[lang] = { translation: modules[path].default };
  }
}

i18n
  .use(initReactI18next)
  .init({
    resources,
    fallbackLng: 'en',
    interpolation: { escapeValue: false },
  });

export default i18n;The import.meta.glob pattern means every .json file you add to src/i18n/locales/ is automatically picked up. No manual imports are needed when you add new languages later.
Import i18n Before Your App Renders
Open src/main.tsx and import the i18n configuration:
import React from 'react'
import ReactDOM from 'react-dom/client'
import App from './App.tsx'
import './index.css'
import './i18n'  // ← Add this import!

ReactDOM.createRoot(document.getElementById('root')!).render(
  <React.StrictMode>
    <App />
  </React.StrictMode>,
)
If you skip this step, t() will just return translation keys instead of translated text.
4
Handle Dynamic Content in React Translations
Real apps need more than static strings. Here’s how react-i18next handles the most common dynamic content patterns.
Interpolation (Variables) in i18next
Use {{variableName}} syntax in your JSON and pass the value to t().
Update src/i18n/locales/en.json:
{
  "welcome": "Welcome",
  "userGreeting": "Welcome back, {{firstName}}!",
  "description": "This is a localization demo.",
  "clickMe": "Click me"
}
Use it in your component:
import { useTranslation } from 'react-i18next';

function App() {
  const { t } = useTranslation();
  const user = { firstName: 'Sarah' };

  return (
    <div>
      <h1>{t('welcome')}</h1>
      <p>{t('userGreeting', { firstName: user.firstName })}</p>
      <p>{t('description')}</p>
      <button onClick={() => alert(t('clickMe'))}>{t('clickMe')}</button>
    </div>
  );
}

export default App;
The second argument to t() is an object with the values you want to substitute. You can have as many variables as you need. Just make sure each one appears in your translations.
React i18next Pluralization
Use the _one / _other suffix pattern. The variable must be named count:
Update src/i18n/locales/en.json:
{
  "welcome": "Welcome",
  "userGreeting": "Welcome back, {{firstName}}!",
  "description": "This is a localization demo.",
  "clickMe": "Click me",
  "newMessages_one": "You have {{count}} new message.",
  "newMessages_other": "You have {{count}} new messages."
}
Use it in your component:
import { useTranslation } from 'react-i18next';

function App() {
  const { t } = useTranslation();
  const user = { firstName: 'Sarah' };
  const [messageCount, setMessageCount] = useState<number>(1);

  const handleIncrement = () => {
    setMessageCount(messageCount + 1);
  };

  return (
    <div>
      <h1>{t('welcome')}</h1>
      <p>{t('userGreeting', { firstName: user.firstName })}</p>
      <p>{t('newMessages', { count: messageCount })}</p>
      <p>{t('description')}</p>
      <button onClick={handleIncrement}>{t('clickMe')}</button>
    </div>
  );
}

export default App;
i18next selects the correct plural form automatically. It also handles languages with more than two plural forms (like Polish or Arabic) without any extra configuration.
Translate Links and HTML with the Trans Component
For translations containing HTML elements like links or bold text, use the Trans component:
{
  "termsText": "I agree to the <1>Terms of Service</1> and <3>Privacy Policy</3>."
}
The <1> and <3> tags are index-based placeholders that map to child elements (counting from 0):
import { Trans } from 'react-i18next';

<Trans i18nKey="termsText">
  I agree to the <a href="/terms">Terms of Service</a> and
  <a href="/privacy">Privacy Policy</a>.
</Trans>
This keeps your JSX elements in the component while still allowing translators to reorder surrounding text naturally.

Translate Your React App’s JSON Files
Your React app is now set up for internationalization. The next step is to produce the actual translation files for each language.
PTC is designed exactly for this. This AI localization tool integrates directly with your GitHub, GitLab, or Bitbucket repository. It reads your source en.json, and opens a pull request with translated files for each language you need.
Because of the auto-loading configuration you set up in Step 3, those new files work immediately with no code changes required.

PTC starts with a free 30-day trial that lets you translate 20,000 words into 2 languages. After that, you pay as you go with no subscription.
If you prefer not to integrate with your repository, you can alternatively:
- Use the PTC API to set up continuous localization
- Manually upload a JSON file and get a translated file back
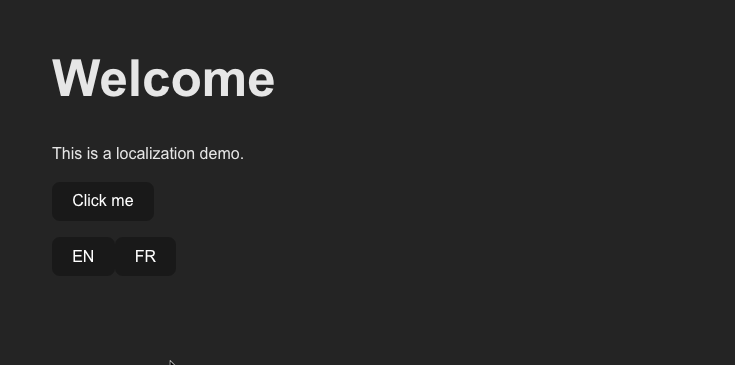
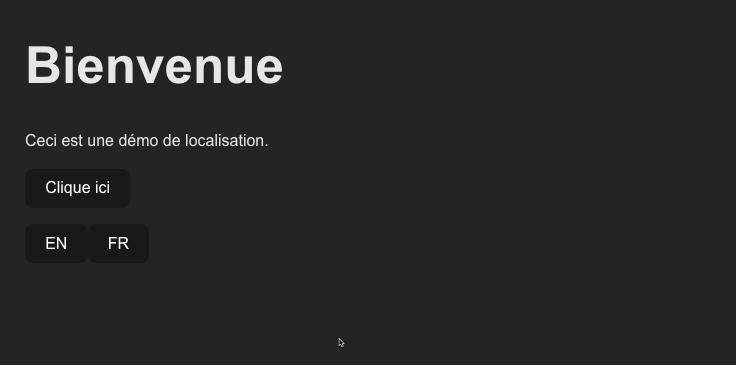
Test React Translations with a Language Switcher
Add language buttons to src/App.tsx and verify your react-i18next setup is working:
import { useTranslation } from 'react-i18next';

function App() {
  const { t, i18n } = useTranslation();

  return (
    <div>
      <h1>{t('welcome')}</h1>
      <p>{t('userGreeting', { firstName: user.firstName })}</p>
      <p>{t('newMessages', { count: messageCount })}</p>
      <p>{t('description')}</p>

      <p>
        <Trans i18nKey="termsText">
          I agree to the <a href="/terms">Terms of Service</a> and <a href="/privacy">Privacy Policy</a>.
        </Trans>
      </p>
      <button onClick={() => alert(t('clickMe'))}>{t('clickMe')}</button>

      <button onClick={() => i18n.changeLanguage('en')}>EN</button>
      <button onClick={() => i18n.changeLanguage('fr')}>FR</button>
    </div>
  );
}
Run npm run dev and click the language buttons. The text should update immediately without a page reload. If it does, your React i18n setup is working correctly.


Next Steps: Optimize Your React Localization Setup
Your React app now has full multi-language support. There are a few additions worth considering before going to production:
Auto-detect the User’s Language
Install i18next-browser-languagedetector to automatically load the correct language from the user’s browser settings, URL, or saved preferences:
npm install i18next-browser-languagedetectorUpdate src/i18n/index.ts:
import i18n from "i18next";
import { initReactI18next } from "react-i18next";
import LanguageDetector from "i18next-browser-languagedetector";

type TranslationResources = string | { [k: string]: TranslationResources } | TranslationResources[];

const modules = import.meta.glob<{default: Record<string, TranslationResources>}>('./locales/*.json', { eager: true })

const resources: Record<string, { translation: Record<string, TranslationResources> }> = {};

for (const path in modules) {
  const lang = path.match(/\.\/locales\/(.*)\.json$/)?.[1];
  if (lang) {
    resources[lang] = { translation: modules[path].default };
  }
}

i18n
  .use(LanguageDetector) // detect browser/localStorage/etc.
  .use(initReactI18next)
  .init({
    resources,
    fallbackLng: "en",
    supportedLngs: ["en", "fr", "de", "ar"], // adjust to your languages
    interpolation: { escapeValue: false },
    detection: {
      order: ["querystring", "localStorage", "cookie", "navigator"],
      caches: ["localStorage", "cookie"],
    }
  });

export default i18n;
Lazy-Load Translations
By default, all translation files are bundled at build time. For React apps with many languages, use i18next-http-backend to fetch only the language files the user actually needs:
npm install i18next-http-backendUpdate src/i18n/index.ts:
import i18n from "i18next";
import { initReactI18next } from "react-i18next";
import Backend from "i18next-http-backend";
import LanguageDetector from "i18next-browser-languagedetector";

i18n
  .use(Backend) // load JSON over HTTP
  .use(LanguageDetector)
  .use(initReactI18next)
  .init({
    fallbackLng: "en",
    supportedLngs: ["en", "fr"],
    interpolation: { escapeValue: false },
    backend: {
      loadPath: "/locales/{{lng}}/{{ns}}.json"
    }
  });

export default i18n;
Move your translation files to public/locales/ so they’re served as static assets:
public/
  locales/
    en/
      translation.json
    fr/
translation.jsonWith this structure, switching to French fetches /locales/fr/common.json on demand rather than bundling it with your app. This keeps your initial bundle lean regardless of how many languages you support.

Translate React with PTC
Your React app is internationalization-ready. Now let PTC handle the translations.
Your first 20,000 words are free, no subscription required.

Translate React with AI
Get context-aware translations in minutes

Upload files, or automate via API or Git integration