Learn how to prepare your iOS app for localization, translate it with AI, and add translations back into Xcode, all using a SwiftUI demo app.
iOS localization is the process of adapting your app’s text, formatting, and assets to support multiple languages and regions.
This guide uses a demo app to walk you through the full process, from preparations in Xcode to creating and integrating translations into your project. Our demo app, Bookshelf, is a simple book tracking app that covers the localization scenarios you’re most likely to run into: UI strings, pluralization, and testing locales.
We’ll be working with SwiftUI and Xcode 15+, using String Catalogs as the primary localization format
Part 1: Understanding iOS Localization
Before jumping into Xcode, it’s worth understanding what localization actually involves and what makes it different from internationalization.
Internationalization vs. Localization in iOS — What’s the Difference?
Internationalization (i18n) and localization (l10n) are two separate stages, and they need to happen in that order.
Internationalization is the technical groundwork. It means structuring your code so that text, images, and formatting can vary by locale without requiring code changes. You do this once, ideally before your first release.
Localization is the ongoing work that follows: writing translations, adjusting layouts, and supplying locale-specific assets for each language you want to support.
| Internationalization (i18n) | Localization (l10n) | |
| What it is | Preparing your code for localization | Adapting your app for a specific locale |
| When | Before your first release | Ongoing, per language |
| Who | Developers | Developers and translators |
| Examples | Extracting strings, using locale-aware formatters | Translating strings, localizing screenshots |
The most common mistake is treating localization as a post-launch task, only to find the codebase isn’t ready for it. Going back to fix hardcoded strings, fixed-direction layouts, and non-locale-aware formatters across an existing app takes much longer than building with localization in mind from the start.
Part 2: Setting Up Your Xcode Project
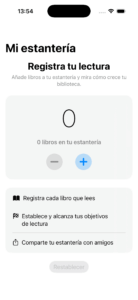
We’ll be working with Bookshelf, a simple demo app that allows users to track how many books they’ve read. It’s built with SwiftUI and minimal by design.

By the end of this guide, BookShelf will run in English, Spanish, and Arabic, handle plural strings correctly across all three languages, and mirror its layout automatically for Arabic readers.
Step 1
Enable Localization
Open BookShelf in Xcode and select the project file in the Navigator. Under the Info tab, scroll to the Localizations section. English is already listed as the base language. Click the + button to add your first language. We’ll add Spanish and Arabic for this demo.

Step 2
Create a String Catalog
Next, add a String Catalog.
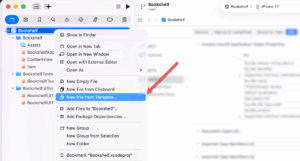
- Right-click on your project and select New File from Template.
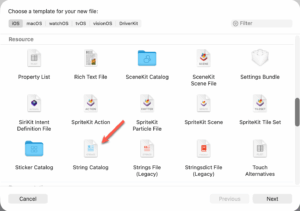
- Search for String Catalog and add it. The default name will be Localizable.xcstrings. No need to change it.
- Build the project once with Cmd+B. Xcode will scan your code, find every localizable string, and populate the catalog automatically.


Step 3
Mark Strings for Localization
After building the project, open Localizable.xcstrings and you’ll see Xcode has already extracted every string literal from your SwiftUI views and added them to the catalog with their English values filled in. For most strings, that’s all you need to do.

There are a couple of patterns where Xcode can’t do this automatically, and both fail silently, with the app just displaying the untranslated string with no warning.
Tip 1: Avoid Passing Variables to Text
When you pass a variable to a Text view instead of a string literal, SwiftUI treats it as a plain string and skips the catalog lookup entirely.
// NOT localized
let title = "welcome_title"
Text(title)

// Localized correctly
Text(LocalizedStringKey(title))
Tip 2: Use String(localized:) Outside of Views
For strings you need to localize in a view model, helper function, or anywhere outside a SwiftUI view, use String(localized:) rather than a plain string.
let errorMessage = String(localized: "error_generic")Step 4
Add Plural and Device Variants
Strings sometimes need different versions depending on context. This includes plural forms that change with a number, or text that differs by device. You can manage both directly in the String Catalog.
Pluralization
BookShelf, our demo app, shows a count of books on the user’s shelf. In English that’s simple: “1 book” vs “3 books”. But plural rules vary across languages, and getting this wrong produces unnatural text in other locales.
Start with the string in your SwiftUI view:
Text("\(bookCount) books on your shelf")
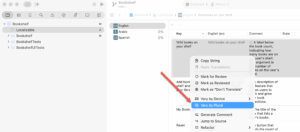
Open the String Catalog, right-click the key, and choose Vary by Plural. Xcode generates the plural categories automatically and pre-fills them with the source string.
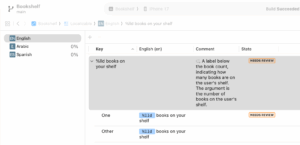
For English, you’ll see One and Other. Just correct the One field to the singular form: “%lld book on your shelf”. The Other form is already right as-is.
Xcode marks both as Needs Review until you confirm them. Once you’ve corrected the One form, you can mark them as reviewed.
You’ll also see Arabic and Spanish listed in the sidebar at 0%. You don’t need to do anything for those languages now. Later, when you export to PTC for translation, the plural structure travels with the file. For Arabic, PTC will generate translations for all six plural categories (zero, one, two, few, many, and other) because Arabic grammar requires all six. For Spanish, it’s two, same as English.
Device Variations
Some text should differ by device, such as “Tap to continue” on iPhone vs “Click to continue” on Mac. To set this up, right-click the key in the catalog and choose Vary by Device. Add the devices you want to customize and enter the appropriate string for each. At runtime, iOS serves whichever version matches the current device.
Device variations are less common than plural variations, but useful for apps that run on both iOS and macOS.
Part 3: Translating Your iOS Localization Files with PTC
Your String Catalog is set up and your strings are ready. Now it’s time to add translations.
For a small project, you could do this manually by opening each language file and filling in translations directly. But as your app grows, that quickly becomes unmanageable across hundreds of keys and dozens of languages.
This is where PTC comes in — an AI translation tool that handles uploading, translating, and syncing your localization files, with options to integrate into your repo or CI/CD pipeline.
🔗 Learn more: AI-powered mobile app localization with PTC — how PTC handles translations end-to-end for iOS and Android apps.
Below, we’ll walk you through getting started.
1
Export your String Catalog from Xcode
Go to Product → Export Localizations in the Xcode menu bar. Xcode packages your String Catalog into an .xcloc file for each target language.
For this guide, we only need the .xcstrings file inside the .xcloc package. To get to it, right-click the exported .xcloc file in Finder and select Show Package Contents. You’ll find Localizable.xcstrings inside.
💡Do you see an “Unable to build project for localization string extraction”notification?
This happens when your project uses iOS-only APIs that Xcode can’t compile against its internal macOS SDK during string extraction. To fix it, select the project target under TARGETS, go to Build Settings, search for “Use Compiler to Extract Swift Strings“, and set it to No. Then try exporting again.
2
Sign up for PTC
Sign up for a free PTC trial — no credit card required. The free trial lets you translate 20,000 words into two languages, which in most cases, is enough to localize an app.
Adding more languages later is easy. PTC uses a Pay-As-You-Go model with no monthly subscription fees. You only pay for what you translate.
After signing up, the project setup will open automatically.
3
Set Up Your Project and Translate
- Drag and drop your
Localizable.xcstringsfile into PTC. Once added, you’ll see an output file name field. Leave it asLocalizable.xcstrings. Xcode expects this exact name when resolving localized strings.

- Select your target languages. The free trial supports two languages. For our demo app, we’re selecting Spanish and Arabic.

- Describe what your app does and who it’s for. This is what allows PTC to produce context-aware translations that use the right tone, voice, and terminology for your audience.

- Add terms to your glossary. PTC automatically adds your app name to it. You can also add any brand-specific terminology that should be translated in a specific way, or not translated at all.
After you click Start Translation, PTC will take a few minutes to process your file.
4
Review and Download iOS App Translations
Once translation is complete, go to the Translations tab. You’ll see a table listing each source string alongside its translation. You or any team member you add to the project can edit translations manually directly in this view.
If something looks off, you can report a problem with a specific translation and request a free AI retranslation. PTC learns from the feedback you provide and applies it to future strings in the same project.

If any translated string exceeds its length limit, it will be highlighted in the table. PTC sets these limits automatically based on the characteristics of each target language. You have three options:
- Accept the longer translation if your UI can accommodate it
- Request a retranslation that fits within the current limit
- Adjust the limit in Settings → Translation lengths

Part 4: Integrating Translations Into Your Xcode Project
With your translations ready in PTC, the last step is getting them into your Xcode project. You have three options.
Option 1
Manually Download Files from PTC
Go to the Resource Files tab in PTC and download the zip file. It contains a single Localizable.xcstrings file with your English source strings and all translations included.
To add the file to your project:
- Make sure Xcode is closed
- Open your project folder in Finder
- Replace the existing
Localizable.xcstringswith the one from PTC - Restart Xcode
Your translations will appear in the String Catalog, with a checkmark next to each fully translated language.

Option 2
Integrate with Git
If your project lives on GitHub, GitLab, or Bitbucket, you can connect PTC directly to your repository for continuous translation.
In your PTC dashboard, to Settings → Merge Requests and click Add Git Integration. You’ll need to provide your repository URL, grant PTC access, and choose your branch and source files. PTC will send a merge request with the translations, which you can review and accept like any other code change.
Option 3
Use the API
PTC’s API gives you a way to automatically generate and download localization files as part of your own build or deployment pipeline. This is worth exploring if you have a more complex setup or want full control over when and how translations are pulled into your project.
To get started, go to Settings → Manage API tokens. Click on Add access token to generate a token, then see the API documentation for all endpoints.
Part 5: Testing Your Localized iOS App
Now, it’s time to check that your translations look and work as expected.
Testing with the Scheme Language Setting
The quickest way to test a specific language is through your Xcode scheme. Go to Product → Scheme → Edit Scheme and click the Options tab. Change App Language and App Region to the locale you want to test, then run the app with Cmd+R.
This works well for most languages. You should see the same layout and design as the English version, with all text switched to the selected language.
Testing Arabic and other RTL (Right-to-Left) Languages
For Arabic and other right-to-left languages, the scheme language setting can be unreliable in the Simulator. Use the Simulator’s own language settings instead:
- Run the app with Cmd+R to open the Simulator
- Press Cmd+Home to go to the home screen
- Open Settings → General → Language & Region
- Tap Add Language, select Arabic, and set it as the primary language
- The Simulator will restart. Open your app from the home screen
Check that text appears in Arabic and that the layout mirrors correctly, with the navigation title and content aligned to the right.

iOS Localization Best Practices
Check Your UI for Varied Text Length
Claude responded: Languages vary in word length.
Languages vary in word length. German, for example, tends to run longer than English and can easily break a UI that was only designed with English in mind.
To avoid this:
Don’t Skip Pluralization Variants
Languages don’t express quantities the same way. English needs two plural forms (one and other), but many languages need more. Russian has five plural categories, Arabic has six, and Japanese has none at all. If you skip pluralization variants for a target language, your app will display unnatural or grammatically incorrect strings for that locale.
String Catalogs handle this automatically. When you add a language, Xcode generates the correct plural fields for that language’s grammar rules. Make sure all generated fields are filled in before shipping.
Localize Images and Assets
If your app uses images that contain text, or visuals that are culturally specific, those need to be localized too. A translated app that still shows English text inside images breaks the experience for non-English users.
To localize an image in Xcode, open Assets.xcassets, select the image, and in the Attributes Inspector click Localize. Choose the languages you want to provide variants for and replace each with the appropriate version. Xcode serves the correct image automatically based on the user’s locale.
Keep Your Base Language Complete
Your base language (usually English) acts as the reference for all other localizations. If a string is missing a translation for a specific language, iOS falls back to the base language version. This means an incomplete base language can cause unexpected fallbacks even in languages that are otherwise fully translated.
Before each release, check that your String Catalog shows no missing or stale strings in the base language. Xcode flags these automatically during the build.
Localize Your App Store Listing
The App Store listing is as important as the app itself. A localized app with an English-only listing loses users at the point of discovery, before they’ve even downloaded it.
In App Store Connect you can localize your app name, subtitle, description, and keyword field for each territory. Keywords are particularly valuable. Apple indexes keywords from multiple locales per territory, which effectively multiplies your keyword character budget beyond the standard 100 characters.
To translate your App Store listing content, use PTC’s Paste to Translate feature. Paste in your app name, subtitle, description, or keyword field and PTC will translate it into your target languages in minutes.
Frequently Asked Questions
Why is iOS localization not working?
The most common cause is that the localization file isn’t included in the app target.
Click on Localizable.xcstrings in the Navigator, open the File Inspector on the right, and check that your app target is checked under Target Membership. Also make sure the language you’re testing is listed in your project’s Localizations section under the Info tab.
If both look correct, try cleaning the build folder with Shift+Cmd+K and rebuilding.
What are the iOS localization file formats?
Xcode supports several file formats for localization:
.xcstrings(String Catalog) is the current default since Xcode 15. It’s a single JSON-based file that consolidates all your strings, plural rules, and device-specific variants. Xcode extracts strings automatically at build time and flags any missing translations. This is the format to use for any new project..stringsis the legacy format, still valid and common in older codebases. It stores key-value pairs for a single language in a plain text file. You’ll need a separate .stringsdict file alongside it to handle pluralization..stringsdicthandles plural rules in projects that use .strings files. String Catalogs have built-in plural support, so you won’t need this in new projects..xliffand.xclocare export formats used when handing off strings to translators or a translation platform. They’re not storage formats. Xcode generates them when you export for translation.
How do I localize the app name in Xcode?
Create a new strings file named InfoPlist.strings and localize it for each supported language. In each language version of the file, add the following line with the translated app name:
CFBundleDisplayName = "Your Translated App Name";
Select the file in the Navigator, open the File Inspector, and click Localize to add language variants. iOS will display the correct app name based on the user’s device language.
How do I change the app language programmatically without restarting?
iOS doesn’t provide a native API for switching the app language at runtime without restarting. The standard approach is to set the AppleLanguages key in UserDefaults and ask the user to restart the app:
UserDefaults.standard.set(["es"], forKey: "AppleLanguages")
UserDefaults.standard.synchronize()The language change takes effect the next time the app launches. If your app requires in-session language switching without a restart, you’ll need to manage localization manually by loading the appropriate bundle for the selected language.
How do I change my app’s language on App Store Connect?
In App Store Connect, go to your app’s page and select the language you want to add from the left sidebar. You can localize your app name, subtitle, promotional text, description, keywords, and screenshots for each territory independently.
Changes to your App Store listing don’t require a new app submission. You can update metadata at any time.
Why does my app fall back to English for unsupported languages?
iOS uses your base language as a fallback when a translation isn’t available for the user’s preferred language. If a user’s device is set to a language your app doesn’t support, or if a specific string is missing a translation, iOS serves the base language version instead. This is expected behavior. To minimize fallbacks, make sure your String Catalog shows no missing or stale strings before each release.
Does localizing an iOS app actually help downloads?
Yes, consistently. Apps localized into five or more languages generate significantly more downloads on average than English-only apps, and non-English markets account for more than half of global App Store revenue. Japan, South Korea, and China are among the highest-earning markets outside English-speaking countries.
What languages should I localize my iOS app into first?
Start with the languages that offer the best combination of market size and translation cost. Spanish, French, German, Japanese, and Simplified Chinese are the most common starting points for apps expanding beyond English.
If your app already has users in a specific region, prioritize their language first.
For the lowest adaptation cost, start with languages that are geographically or culturally close to your base market and work outward from there.
Can I really use AI to localize my whole iOS app accurately?
Yes. AI translation has become accurate enough for most app content and is significantly faster and cheaper than human translation alone.
PTC uses AI to translate your .xcstrings, .strings, and .stringsdict files in minutes, preserving plural rules and placeholders automatically. 99.8% of translated strings go live without any edits. For best results, tell PTC about your app during setup so translations reflect the right tone and terminology for your audience.

Start localizing your iOS app today
You’ve done the technical work. PTC handles the rest. Sign up for a free trial and translate up to 20,000 words into two languages. No credit card required.

Translate .xcstrings with PTC
Get accurate translations in minutes

Upload single files, or automate via API or Git integration